With today’s intense development of technology and artificial intelligence, the problem of lack of privacy is receiving increasing attention.
It is important to remember that anonymity on the internet is illusory and there are ways to track criminals. Unfortunately, the dark side of technological development also exists. The development of social media allows users to share thoughts, photos and videos.
Currently, there is a phenomenon of over-sharing one’s life on the internet, which may have very unpleasant consequences. Accidentally making one’s credit card details public, by taking a picture of oneself at a dinner party, or against the background of one’s own home (with visible address), may contribute to bank account or home break-in. People using online shopping are exposed to similar problems. Having to enter credit card details and personal information, may be risky for them.
General Data Protection Regulation
In an area of these issues related to the development of technology, on 27th April 2016, the General Data Protection Regulation (GDPR) was implemented (2016/679). This regulation of the European Parliament concerns “the protection of natural persons with regard to the processing of personal data and on the free movement of such data, and Repealing Directive 95/46/EC” (Hoofnagle et al., 2019).
The principles of this directive is to respect people’s freedom and fundamental rights, especially to protect personal data. The main aim of this regulation is to contribute to the accomplishment of an area of security, justice and freedom. It is also important to accomplish economic union and the well-being of natural persons.
The Regulation respects all fundamental rights about freedom and principles written in the treaties, like:
- the protection of personal data
- the respect for private and family live
- the protection of freedom of religion and conscience
- the protection of freedom of information and expression
- the respect for freedom to conduct a business
- the right to a fair trial
- the protection of a cultural, religious and linguistic diversity (Hoofnagle, C. J., Van Der Sloot, B., & Borgesius, F. Z. (2019). The European Union general data protection regulation: what it is and what it means. Information & Communications Technology Law, 28(1), 65-98).
Why does Google Consent Mode need to be implemented?
Information on the internet is often collected using cookies and then used, for example, in marketing campaigns. The more information that is collected, the better the level of personalization of the offer. Nevertheless, as of 25th May 2018, regulations prohibit the use of 3rd-part scripts, which creates cookies, without the user’s consent. It should be remembered that failure to comply with the rules may result in legal consequences. So, according to GDPR, the changes of personal data collections needs to be done also in websites. That is why Google Company adapted its services to this directive. In the meantime, they also improved their functionality to have much more benefits for companies.
What is the Google Consent Mode (version 2)?
The Google Consent Mode (version 2) may be explained as a mechanism, which communicates user’s cookies information to Google. This mechanism was created based on the Consent Mode Standard. It is a pattern whereby website users are first informed of the use of cookies. They will see a special banner and then have the opportunity to express or deny consent to their use.
Willing to give consent users may choose which data will be collected, e.g. agree to collect analytical data, to collect information to personalize content or tracking users activities for advertising purpose. The lack of consent leads to reduction to the minimum necessary for the functioning of the site. In this case all 3rd-party tags are blocked.
GCM v2 allows websites and advertising campaigns to be dynamically adjusted according to the user’s consent status. If users accept all available cookies, the functionality enables the creation of advanced marketing campaigns tailored to users. On the other hand, if cookies are not accepted for tracking purposes, Google Ads and Google Analytics adjust the way to collect and process other data. It means that even if cookies are denied, the functionality allows to collect limited, but valuable information.
What are the benefits of using Google Consent Mode (version 2)?
The benefits of this solution seems to be very encouraging. Firstly, it minimizes the risk of potential fines and violations (regulatory compliance). Secondly, it may optimize advertising campaigns, by allowing better understanding of users behaviour, even if a consent has not been given to full tracking. It provides the possibility to optimize campaigns, as well as ROI (Return of Investment).ROI is a statement of the company’s spending on marketing versus the revenue of the campaigns generated.
Thinking about benefits, we can also say that GCM v2 enables the delivery of more user-relevant advertising and content. Last, but not least, respecting users’ privacy and preferences may build trust and improve the company’s image.
What will happen if Google Consent Mode v2 is not implemented?
The greatest risk is of course exposure to legal consequences as a result of not adapting websites to the provisions of the GDPR. Apart from that, without GCM v2, your google ads will be unprofitable and ineffective. It means that modelled data about customers will not be collected, which results in useless analyses or reports and impossible remarketing campaigns. Moreover, measuring conversions will be very difficult, which means that Google will not be able to estimate which ads or campaigns bring better effect and which ones are worth investing in further. As a consequence, Google’s algorithms will set displays ot click-through rate based on incomplete data and advertising budget will not be used effectively in this case.
Two modes of Google Consent Mode v2
The second version of the Google Consent Mode presents a few new signals. Until now, in the first version, only two parameters were available:
- ad_storage – responsible for advertising cookies
- analytics_storage – provides the possibility to work with analytics
Actually, when we implement GCM v2 to our website, there are two additional parameters:
- ad_user_data – advertising purposes
- ad_personalization – remarketing
The Google mechanism works in two ways. Companies may choose between two modes of the functionality:
- basic
- advanced
In the first case (basic functionality), all the tags (Google Ads, Google Analytics, Floodlight and Conversion Linker) are blocked by default, until users consent to cookie tracking via the Cookie Banner. It is not possible to collect any measurements and data about clients without their consent and conversion modeling in Ads is based on a general model.
The second type (advanced functionality) is more beneficial for sellers. With this mechanism, tags are loaded even if users decline the cookies, because they appear before the consent banner. If the website visitors do not consent to the cookies at all, it is still possible to collect information, but in this case, google tags can not process users’ data for advertisement campaigns, but data gaps are filled by modelling and artificial intelligence and tags send cookieless pings.
How to implement GCM v2?
At the beginning, it is important to have access to Google Tag Manager platform (https://tagmanager.google.com/).
As the next step, it is necessary to have a functionality on the website, which transfers consent data to the Google platform. For this purpose, commercial extensions are available many platforms, e.g. in Shopware 6 the Google Tag Manager plugin may be downloaded from the Shopware store. It is also possible to write custom extensions, which will provide this needed functionality.
For this purpose it is necessary to remember about the following:
1. Additional javascript code should be implemented, when page is loading
<script type="text/javascript" id="spear-devs--cookie-logic">
       (function(w, d, s, l, i) {
           w[l] = w[l] || [];
           w[l].push({
               'gtm.start': new Date().getTime(),
               event: 'gtm.js'
           });
           var f = d.getElementsByTagName(s)[0],
               j = d.createElement(s),
               dl = l != 'dataLayer' ? '&l=' + l : '';
           j.async = true;
           j.src =
               'https://www.googletagmanager.com/gtm.js?id=' + i + dl;
           f.parentNode.insertBefore(j, f);
       })(window, document, 'script', 'dataLayer', ‘GOOGLE_TAG_ID');
   </script>
This code is responsible for communication with the Google Tag Manager platform and needs to be added directly after the ‘<head>’ element.Note that, “GOOGLE_TAG_ID’’ should be changed to proper google container id.
2. Directly after ‘<body>’ element the iframe code should be added
<iframe src="https://www.googletagmanager.com/ns.html?id=GOOGLE_TAG_ID"
height="0" width="0" style="display:none;visibility:hidden">
</iframe>
3. The tags should be also implemented
The default consent is always set to “denied” at the beginning of page loading, until users decide if they want to accept cookies or not:
<script type="text/javascript" id="spear-devs--add-default-consent">
       window.dataLayer = window.dataLayer || [];
       function gtag() {
           dataLayer.push(arguments);
       }


       gtag("consent", "default", {
           ad_user_data: "denied",
           ad_personalization: "denied",
           ad_storage: "denied",
           analytics_storage: "denied",
       });
   </script>
If you as a seller do not use all the tags, not all of them should be implemented.
4. Change the status
The status of the actual state should be changed, regarding the user’s actions on the cookie banner. All of these four variables presented above should be possible to change by users.
5. Additional code
When users accept cookies, additional code should be included on the update event (depending on the accepted cookie):
<script type="text/javascript" id="spear-devs--add-update-consent">
       gtag("consent", "update", {
           ad_user_data: "granted",
           ad_personalization: "granted",
           ad_storage: "granted",
           analytics_storage: "granted",
       });
   </script>
If a commerce plugin is used for the management of cookies, it is necessary to check if the custom banner is configured properly to pass all necessary parameters to the Google Tag Manager platform. In case that custom extension is written, it is important to remember that users should have the possibility to check/uncheck every part of the cookie collection data.
Configuration in Google Tag Manager
All the tags implemented on the website via the code, need also be properly configured in the Google Tag Manager. Note that you need to configure every single tag independently.
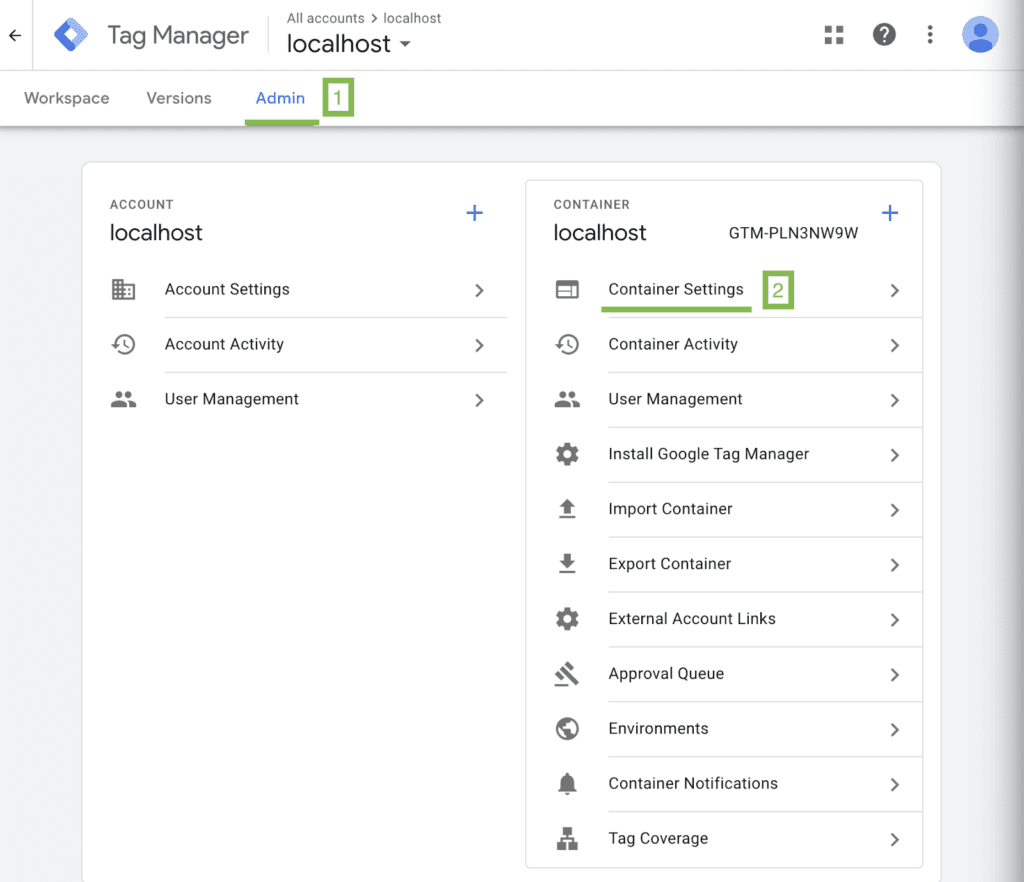
1. Activate GCMv2 advanced
You need to activate GCMv2 advanced in the Tag Manager so go to “Admin” tab (1) in the container and select “Container Settings” (2):
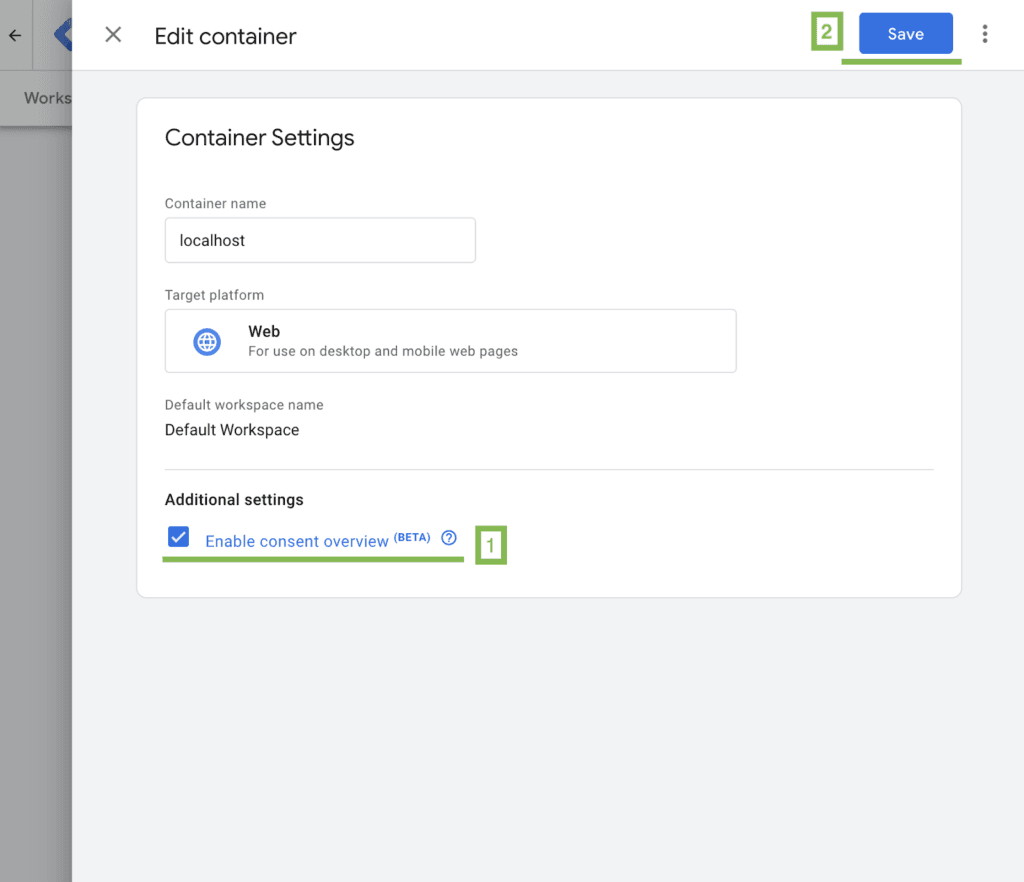
2. Enable consent overview
In the Container settings you need to check option “Enable consent overview” (1) and click “Save” button (2):
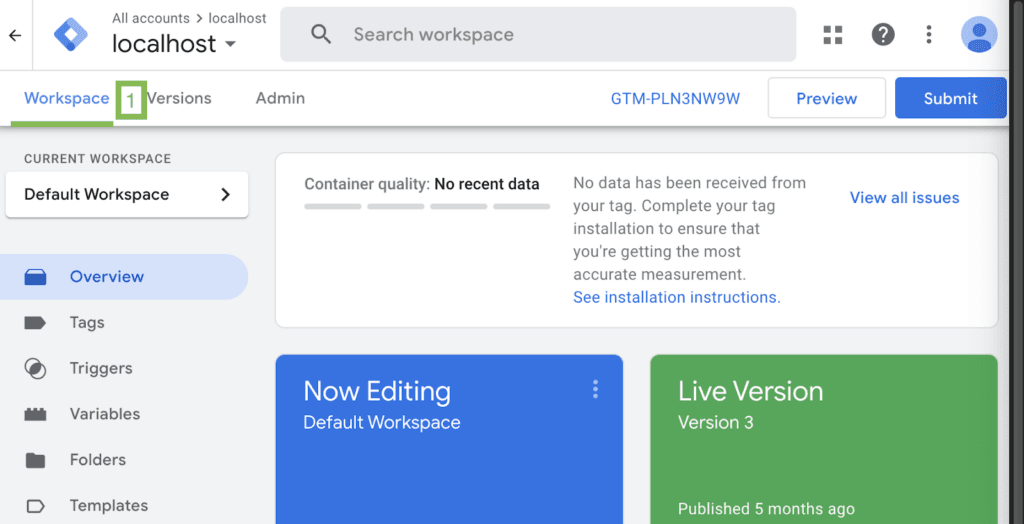
3. Back to “Workspace“
Then, come back to “Workspace” tab (1):
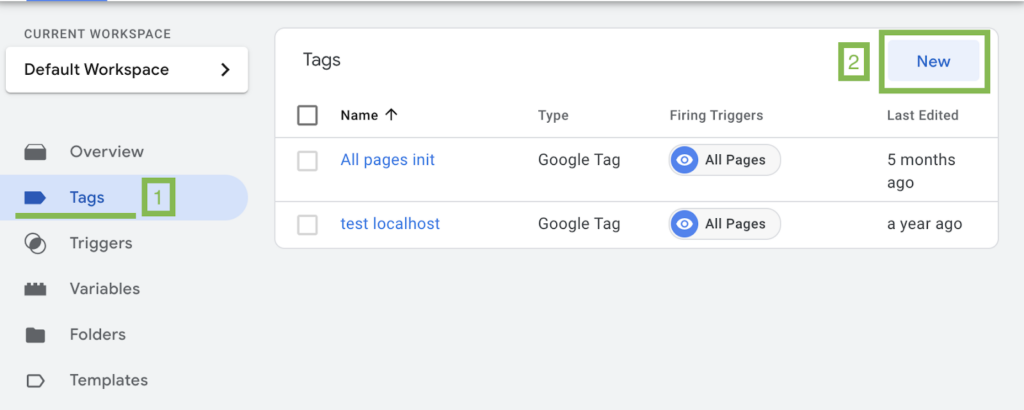
4. Create new tag
Click “Tags” tab (1) and create new tag, by clicking the button “New” (2):
Add the proper name to the tag (1) and click in the “Tag Configuration” space (2) to open an additional tab to choose tag type. For this purpose we use “Google Tag” (3):

After the tag is created you should fill all necessary data (e.g. Tag ID), to be able to fire this tag later. You can also see three additional tabs to configure: “Configuration Settings” (1), “Shared event settings” (2) and “Advanced Settings” (3). You should click on the third option:

In these settings you may see that 4 tags are already builded (1), so there is no need to add something more.
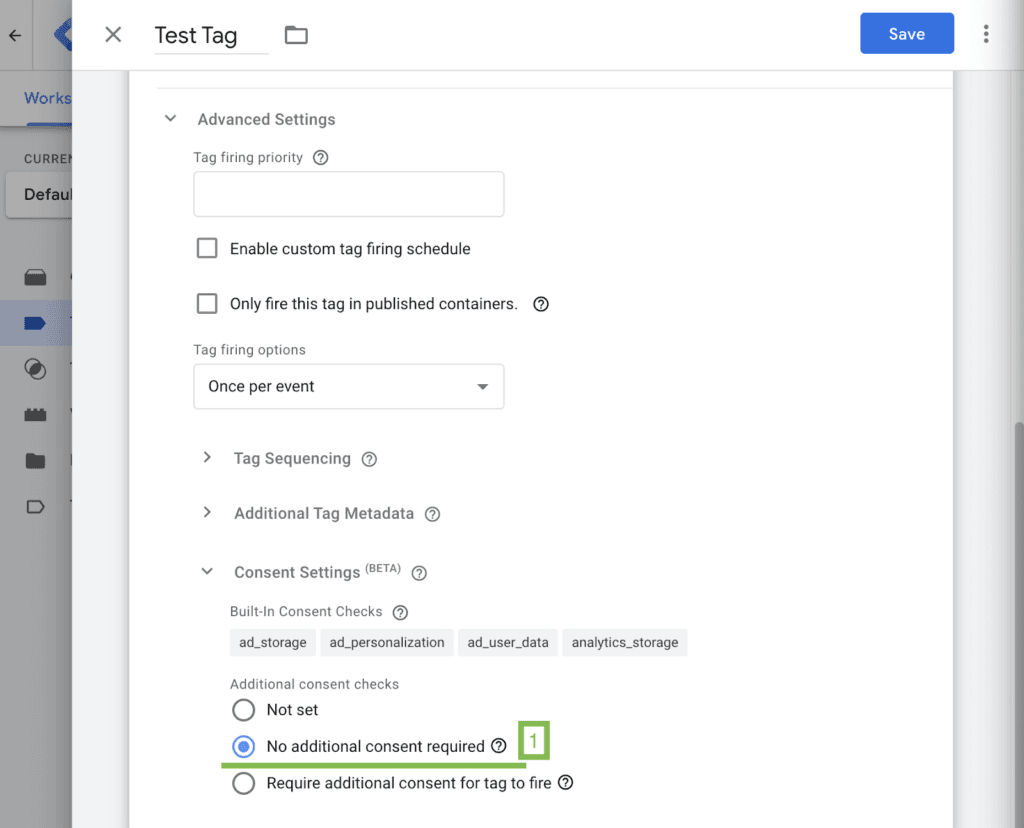
5. Add more/custom tags
Nevertheless, it is possible to add more tags. Google provides a few more tags, which may be added in the option “Require additional consent for tag to fire” (1), as it is shown below:
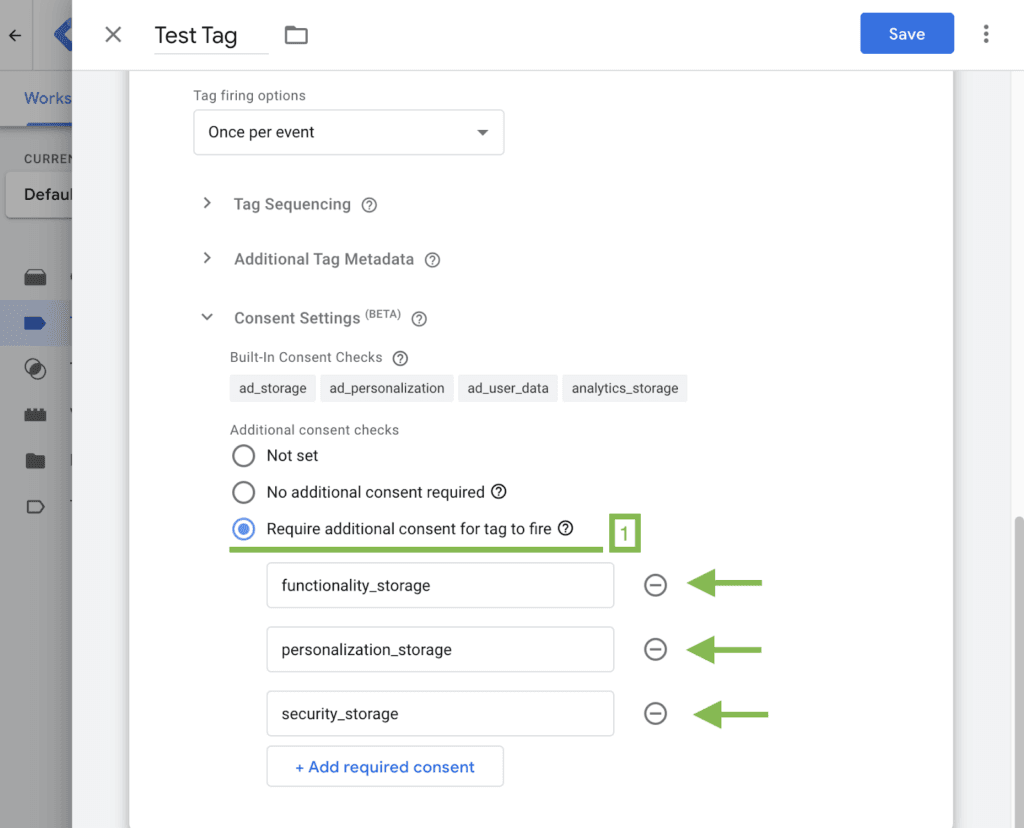
It is also possible to add custom tags, which are not provided by Google, but these tags, which are available are listed below:
- functionality_storage – additional functionality of the website, e.g. language settings
- personalization_storage – tag related to personalization, e.g. video recommendation
- security_storage – tag related to security, e.g. authentication or fraud prevention
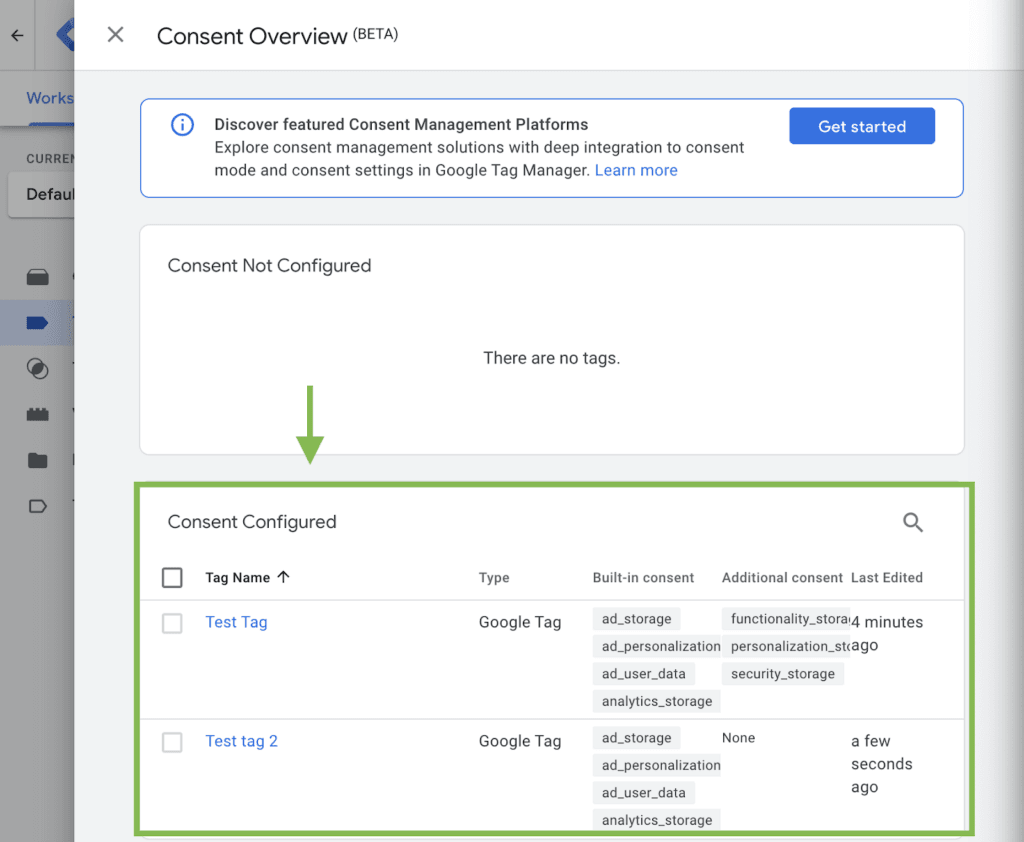
6. Check added tags
Do not forget to save your changes. After this you are able to see which tags are added to the tag, by clicking on the secure icon (1):
The result is shown in the screen below. As you can see there are two tags. One of them has only built-in tags, and the second one – this additional tags we added before.
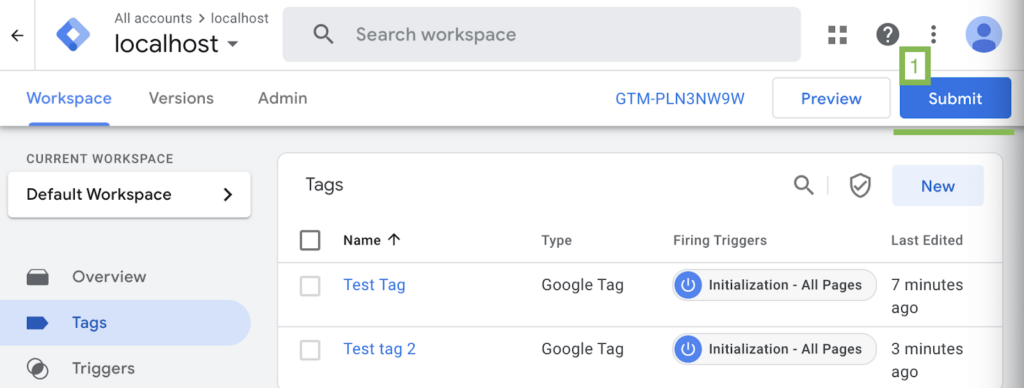
7. Publish your changes
The last step is to publish your changes, by clicking “Submit” button (1):
Summary
You, as a seller or website owner, may choose between basic and advanced mode, as it was written before. All steps to configure Google Consent Mode (version 2) are presented in this document. Note, that if you do not activate “Enable consent overview” in the container settings, you will not be able to get pings from the webiste, before users consent. When this option is activated, the built-in tags will be fired anyway, but will not get all information about the user and the results will be modelled.
Being a seller or website owner it is important to remember, that failure to comply with the rules may result in legal consequences. That is why, the companies responsible for providing the software should go to great lengths to ensure that their applications are secure.